Admin Guide · Setup
Single sign-on
Sign-in is two gates, not one: the method has to succeed, and the person has to be someone your tenant already allows. Scroll both gates, and see what the login page becomes when you move either one.
- Providers
- Domains
- Gates
- Login
Scroll
This page is how people get in. What they can see and do once they are in, page access, item permissions, and the admin flag, lives in Users and access.
Turn on the providers
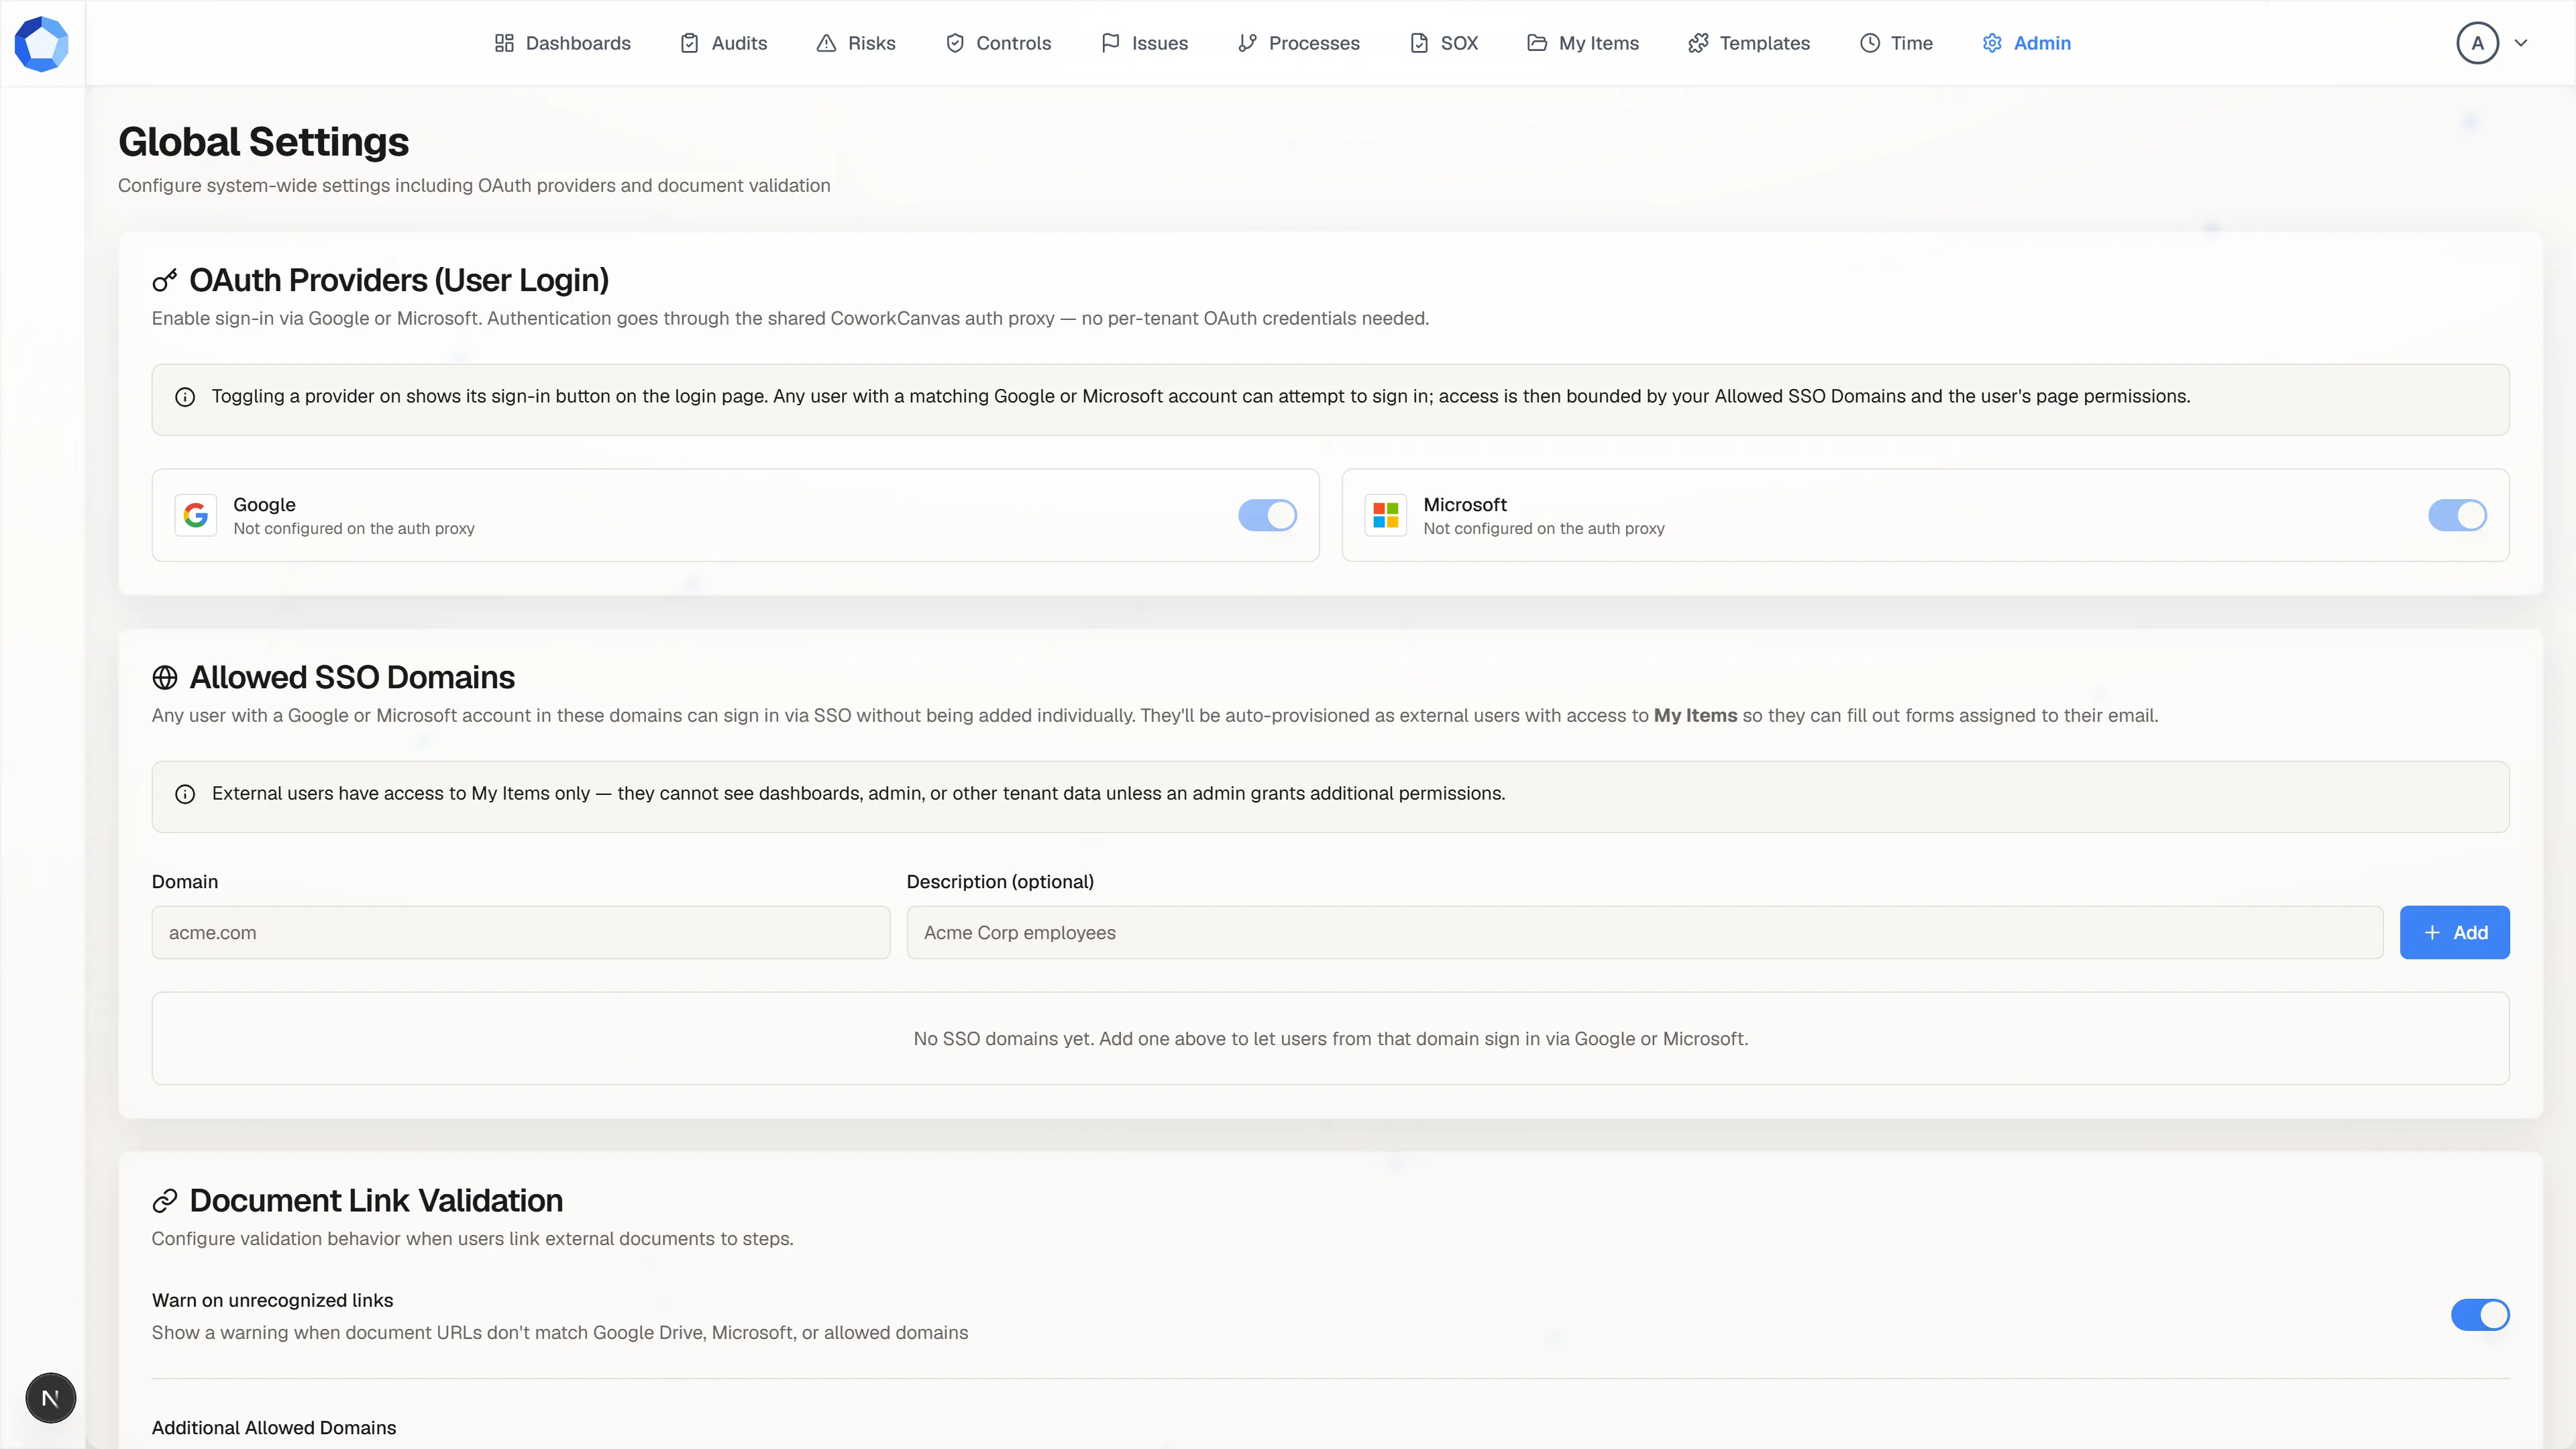
Section titled “Turn on the providers”System Settings, from the Administration page, opens Global Settings, and OAuth Providers (User Login) is the first card. It carries one toggle each for Google and Microsoft. Authentication runs through the shared AssureSwarm auth proxy, so there are no per-tenant OAuth credentials for you to create or paste.
The card states the effect plainly: toggling a provider on puts its sign-in button on the login page. Anyone with a matching Google or Microsoft account can then attempt to sign in, which is exactly why the next card matters.
Pin the domains you trust
Section titled “Pin the domains you trust”Allowed SSO Domains takes a Domain and an optional Description, and Add commits it. Anyone with a Google or Microsoft account at a listed domain can then sign in without you creating their account first.
Be precise about what that grants. They arrive as external users with access to My Items only, enough to answer a form assigned to their email address and nothing else. They cannot see dashboards, the Admin area, or any other tenant data until an administrator grants it.
An empty list is a closed door
Section titled “An empty list is a closed door”With no domains listed, the panel reads that there are none yet. That is the second gate holding: a provider being switched on lets someone reach your login page and authenticate at Google or Microsoft, and they are still turned away, because they have no account here and no domain vouches for them.
Every sign-in clears both gates. The method has to succeed, and the person has to either already hold an account or arrive on an allowed domain. Neither gate alone lets anybody in.
What the login page becomes
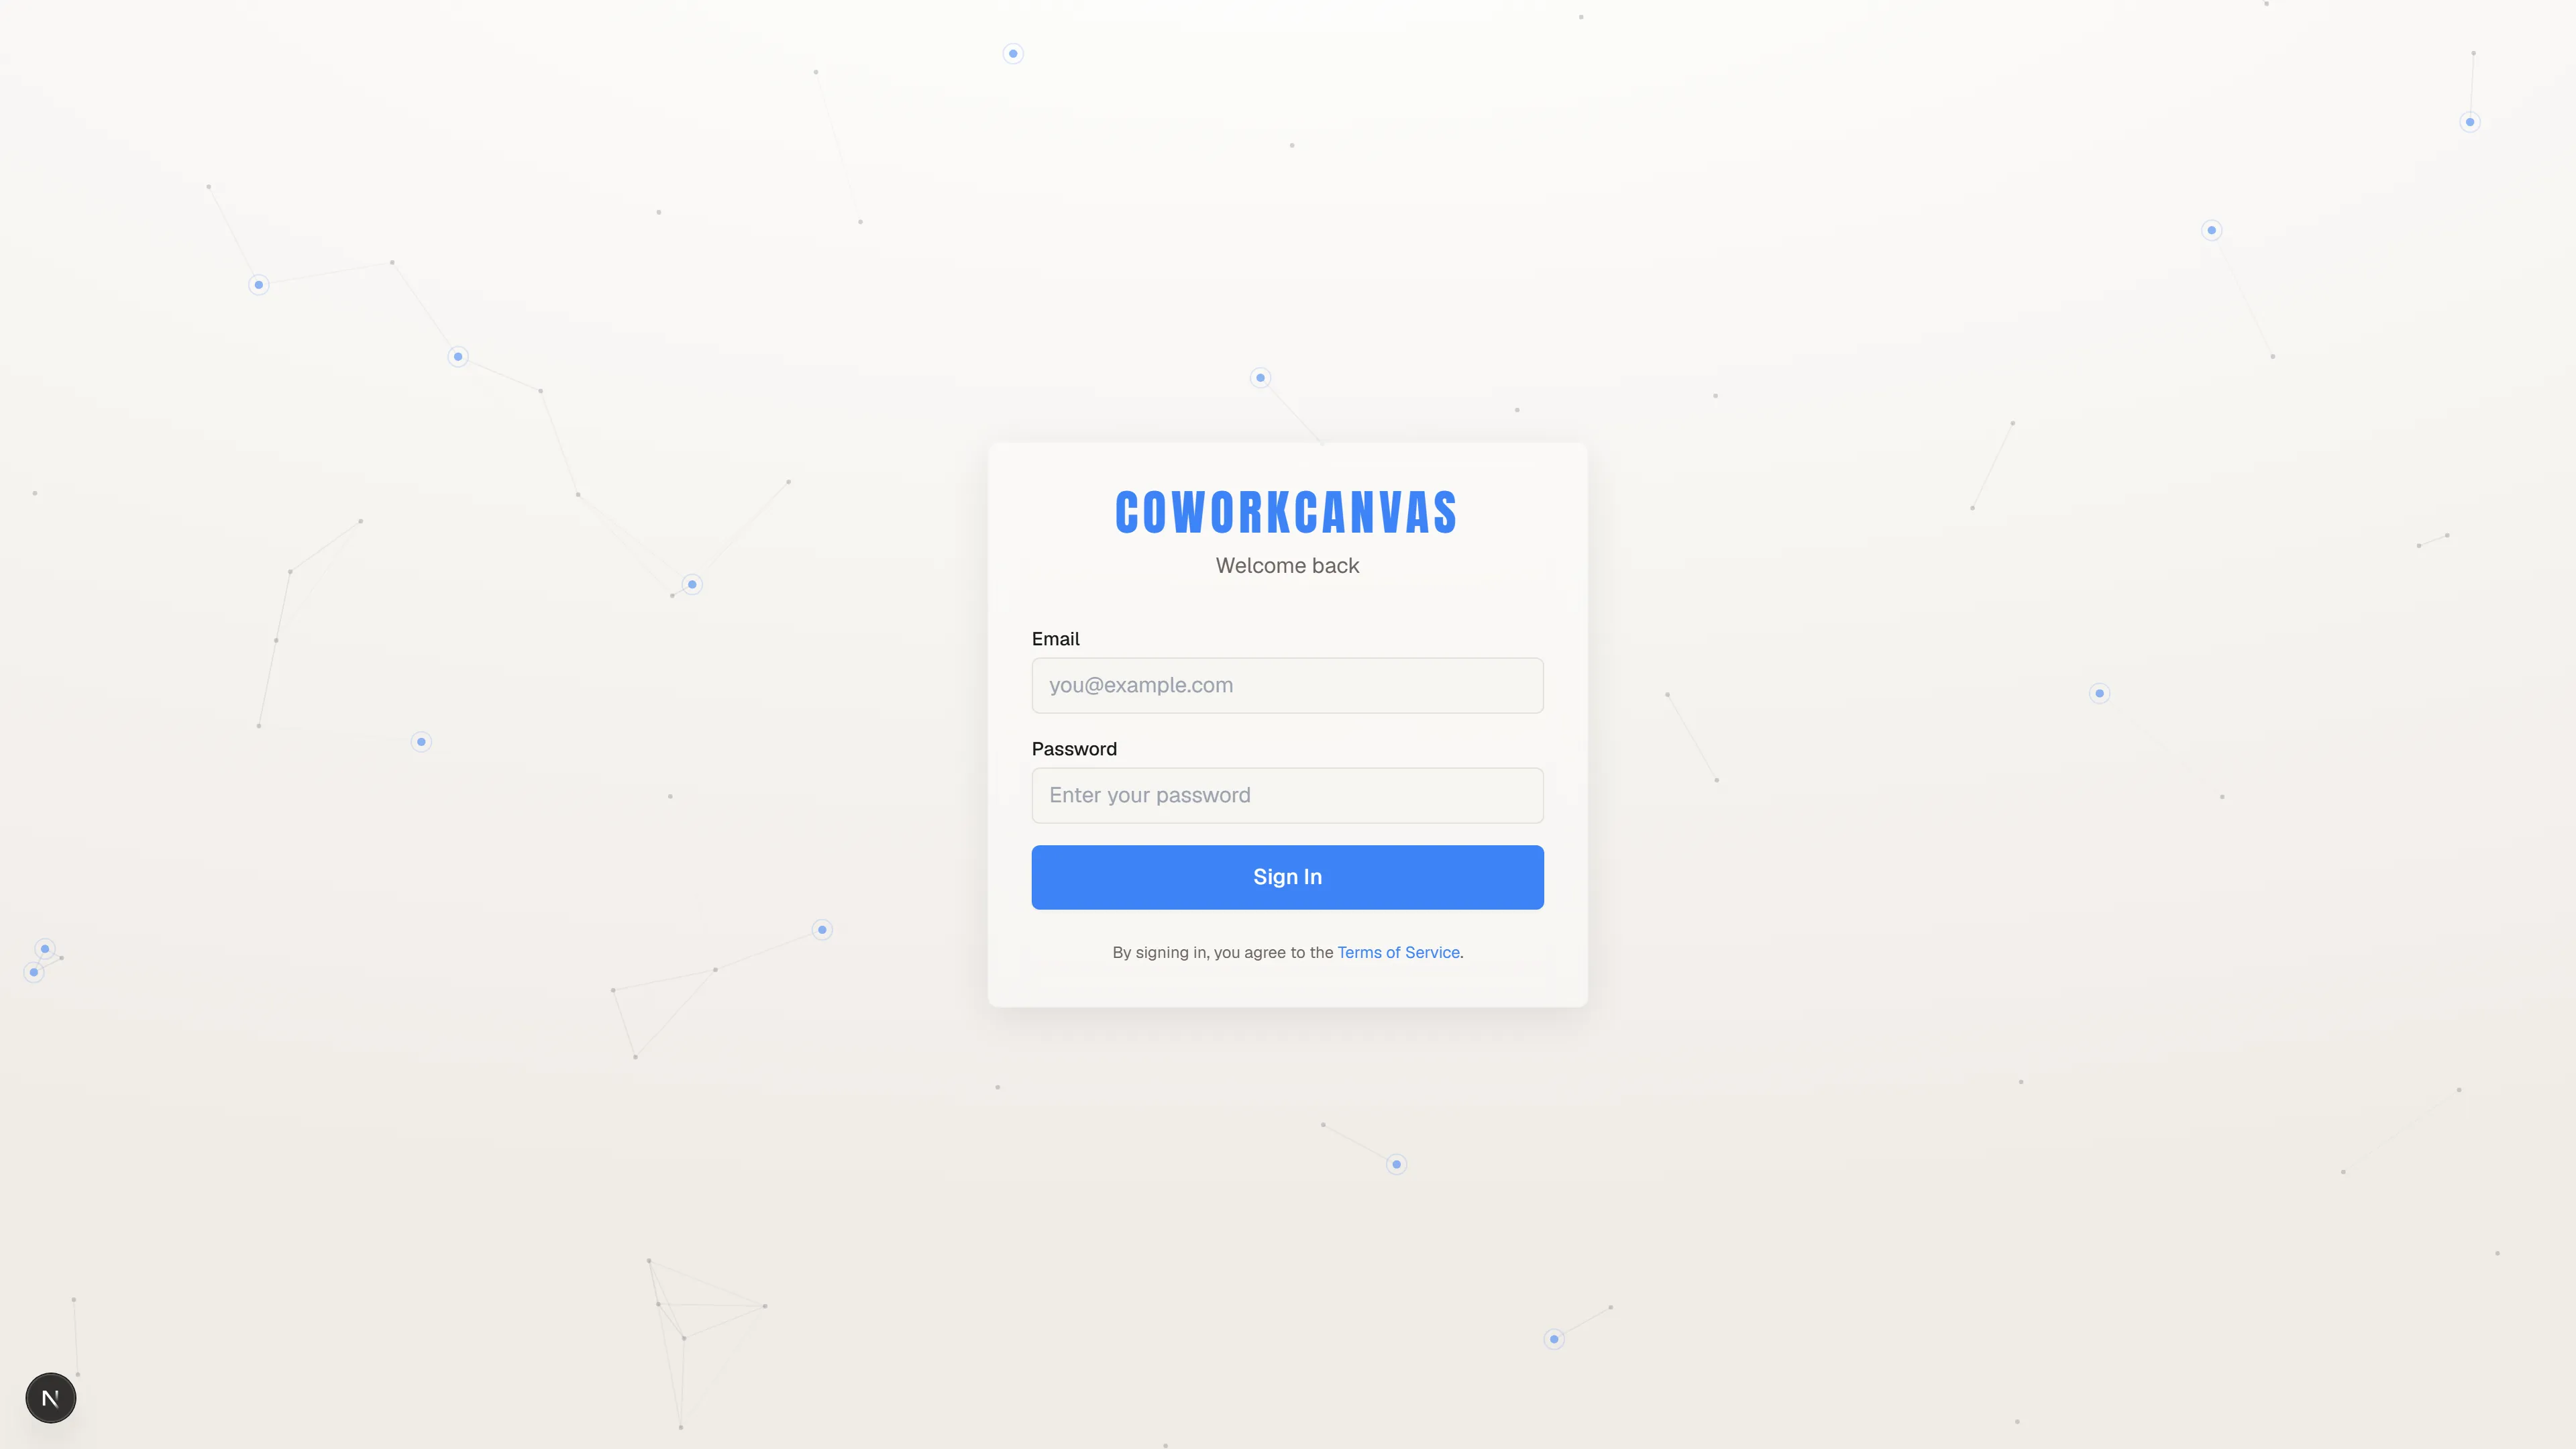
Section titled “What the login page becomes”The sign-in card offers an email field, a password field, and Sign In, and no provider button sits beneath them. The reason is printed on the settings page above, where Google and Microsoft each read Not configured on the auth proxy: a provider has to be switched on for your tenant and wired up on the proxy before its button can render.
Toggle Google on and a Google button joins this card. Toggle Microsoft on and a Microsoft button joins it. Connect SAML and a Sign in with SSO button appears. The login page is a direct readout of the settings above, which makes it the fastest way to confirm a change actually landed.
Sign-in methods by edition
Section titled “Sign-in methods by edition”| Method | Available on | Setup |
|---|---|---|
| Email and password | Every edition. The sign-in method on Studio, and available elsewhere wherever an administrator has enabled it for an account. | None. |
| Sign in with Google or Microsoft | Masterpiece and above. Both are on by default. | None. Toggle either one in System Settings. |
| Sign in with SSO (enterprise SAML) | Masterpiece and above. | Support-assisted. See below. |
Google and Microsoft are the zero-setup path: they work out of the box on any Masterpiece-or-above tenant with nothing to configure on your side or your identity provider’s. SAML is for organizations that want sign-in to run through their own IdP, with its conditional-access and session policies applied.
Opening access to a group of people
Section titled “Opening access to a group of people”You have two levers, and they answer different questions:
- Allowed SSO Domains for a whole organization. List
acme.exampleonce and every person on it is provisioned on first sign-in, as an external user, with no per-person setup. This is the lever for onboarding a domain. - Direct creation for anyone else, and for anyone who needs more than the external default. See Users and access.
A person who signs in through an allowed domain and then needs real access is a normal permissions job afterwards: find them in User Permissions and grant the pages they need.
Enterprise SAML
Section titled “Enterprise SAML”Connecting your identity provider adds a Sign in with SSO button to your login page. Setup is support-assisted: your IdP administrator creates the app on your side, then exchanges values with AssureSwarm support. There is nothing to configure in the product itself.
Your IdP administrator sends support:
- IdP Entity ID, also called the issuer.
- SSO URL, the IdP’s sign-on endpoint, HTTP-POST binding.
- x509 signing certificate, the certificate your IdP signs assertions with.
- Attribute names for email and name, and optionally groups, as your IdP sends them.
Support returns the service-provider values for your connection:
| SP value | Value |
|---|---|
| SP Entity ID, also the SP metadata URL | https://auth.assureswarm.com/saml/{connection-id}/metadata |
| ACS URL | https://auth.assureswarm.com/saml/{connection-id}/acs |
| NameID format | urn:oasis:names:tc:SAML:1.1:nameid-format:emailAddress |
| Binding | HTTP-POST |
| Signing | Assertions must be signed, SHA-256 |
Each connection gets its own {connection-id}, so the exact URLs come from
support with your connection. The walkthroughs below cover the two most common
IdPs; any SAML 2.0 identity provider works with the same values.
In the Okta Admin console:
- Go to Applications → Create App Integration and choose SAML 2.0.
- Set Single sign-on URL to the ACS URL, and Audience URI (SP Entity ID) to the SP Entity ID.
- Set Name ID format to EmailAddress.
- Add attribute statements:
email→user.emailandname→user.displayName. - Finish creating the app, then assign the users or groups who should be able to sign in.
- From the app’s Sign On tab, collect the Identity Provider Issuer, which is the IdP Entity ID, the Identity Provider Single Sign-On URL, and the X.509 signing certificate.
- Send those values, plus the attribute names from step 4, to support.
Microsoft Entra ID
Section titled “Microsoft Entra ID”In the Microsoft Entra admin center:
- Go to Enterprise applications → New application → Create your own application, and choose the non-gallery option.
- Open the app’s Single sign-on page and choose SAML.
- Set Identifier (Entity ID) to the SP Entity ID, and Reply URL (Assertion Consumer Service URL) to the ACS URL.
- Under Attributes & Claims, confirm there is an email claim, sourced from
user.mailoruser.userprincipalname, and a name claim. - Download the Certificate (Base64).
- Copy the Login URL and the Microsoft Entra Identifier.
- Send the certificate, Login URL, and Microsoft Entra Identifier, plus the claim names from step 4, to support.
After a SAML connection is enabled
Section titled “After a SAML connection is enabled”Once support registers and enables the connection, the Sign in with SSO button appears on your login page automatically: no downtime, no redeploy, nothing to switch on yourself.
Two follow-ups are worth doing immediately:
- Add your email domains to Allowed SSO Domains, so the people your IdP authenticates are provisioned rather than rejected at the second gate.
- Have someone outside the administrator group sign in through the button, end to end, before you announce it. Attribute mapping and provisioning are much easier to fix for one tester than for a department.
Troubleshooting
Section titled “Troubleshooting”| Symptom | Likely cause | Fix |
|---|---|---|
| The Sign in with SSO button is missing | The connection is disabled, or the tenant is Studio edition, which is credentials-only. | Contact support to check the connection, and confirm your edition. |
| Authentication fails right after signing in at the IdP | The person’s email domain is not in Allowed SSO Domains and no account exists. | Add the domain, or create the user in Users and access. |
| Sign-in loops, or certificate errors | The signing certificate expired or was rotated at the IdP. | Send the new certificate to support. |
| A Google or Microsoft button is missing | The provider is toggled off in System Settings. | Toggle it on and reload the login page. |
For sign-in symptoms not specific to SSO, such as a wrong tenant URL, a deactivated account, or a stale session, see Troubleshooting.